Back with more adventures of die cutting on the edge. Of course since I am a go big or go home girl, I needed to make design for all 5 of the ornaments in the Ornaments Digital Art and each of them had to be a little different, well because I never do anything the easy way 😃.
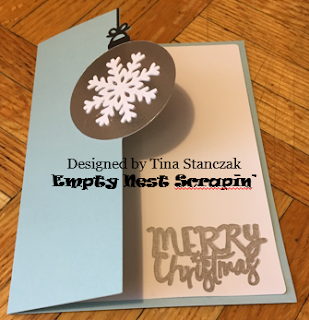
The next card used the next ornament with the snowflake. Whenever I think of snowflakes I think blue. I would have loved to make a card using sapphire cardstock but I didn't have any on hand. Next choice glacier Cardstock not just because I had in on hand from my Holly Jolly project but because it reminded my of Alaska. Yes I am in the middle of 3 projects at once!!!
- Die cutting on the edge Christmas Cards
- Holly Jolly workshop
- Alaskan Cruise 20 layout Album
Back to the Die cutting on the edge Christmas Cards. The first card took 6 1/2 hours to create. I will admit, the first 4 1/2 were spend trying to do a swing fold card in design space. I did not get up from my chair the whole 4 hours.
After sleeping on it, I decided to approach the task using the same steps it takes to make a physical card and things went much smoother. This next card only took 3 1/2 hours mainly because I was going slower and trying to avoid the missteps I had using the pen instead of the scoring blade, etc. Let me tell you the message to insert the scoring blade flew right by me and I had to back it up to check. Before I forget, one more lesson I learned was put the scoring blade or pen in before you insert the cutting mat. yeah, for some reason I went into a mad panic and just tried to change the pen to the scoring blade. Yep black mark on only sheet of glacier Cardstock I had.
 So 10 hours into the challenge I had a 2nd card made.
I nearly forgot that I why this card took such a long time. I tried to cut the Merry Christmas saying out and it was a hot mess in the ~1 inch size. Of course, it was meant to be cut out much larger but I had to give it a try.
Back to the drawing board making the inside of the card. First I tried a second saying which was also a hot mess when it was cut. Actually I tired creating the insides of both yesterdays card and today's card at the same time. Big sigh, I was so many hours into this project with nothing finished so I had to figure something out. I took a leap of faith and changed the saying to "draw" from cut. As I mentioned yesterday, I had never used this feature before. Love, love, love it!
With this saying I switched to the Cricut metallic marker. The "Merry Christmas" saying from CTMH City Sidewalks cartridge is an outline so I colored it in using the Cricut marker.
Products used
Z3605 Ornaments Digital Art
Z3366 Silver Foil Paper
Z3293 Clear Shimmer Brush
X6047 Black Cardstock
Cricut Silver Mettalic marker from Cricut Explore™ Metallic Pen Set
Saying "Merry Christmas" from CTMH City SidewalksI just got my clear shimmer brush and I am also in love with it. Using it on the snowflakes was the easiest step in this project, lol.
Have a wonderfully crafty day and check back tomorrow for another installment of die cutting on the edge.
T


No comments:
Post a Comment