Thursday, April 30, 2020

Graduation Cards with COVID twist

WELCOME FELLOW PAPERCRAFTERS! 


Today I thoughtt I would make graduation cards for my two nephews who graduate this month. I want them to know that even though they do not get to walk the stage, their graduation is still special.  

I started by choosing the "For the Graduate" and "Just Roll with It" stamp sets.  To be honest, I had already bought both of these set.  I was intent on using the graduation stamp set for the College album I was making for my son.  The other set I just couldn't resist.  I will be making more cards with it on Saturday.  


The below picture shows the design for the inside of the card. 
  1. First I stamped the banner across the top of the card, 
  2. followed by the "Sorry Corna Ruined Your" saying a little more than 1 inch below it,
  3. next adding the line/bar right below it
  4. followed by the #quarentinelife
  5. lastly I stamped the hearts in between the banner and the saying.
Now I set the card aside to dry, just to be sure I didn't smudge any ink.....and based on the times we are in, I washed my hands.

Next I stamped the envelope as shown below.

Now I completed the card front using red, white and black for my nephew whose school colors are cardinal and white; and using red and saffron from my nephew whose school colors are red and gold.
As you can see, I added gold sequins to the inside of the shaker card. I was able to complete all the cards I needed to send using supplies I already had on hand.


I wish I could tell you I designed this card myself but I didn't.  I watched a Miss Carries Creations video on YouTube (found at Quick and Easy Graduation Card).

I have to admit there are a couple of blogs I follow to get new ideas and inspiration.  Today everything just fell into place since Miss Carrie was using supplies I had in hand and the inside of the card was easy to put together based on the time we are in. lol

Check back tomorrow for the all new Aurora Scrapbooking Workshop!!

Stay well and Happy crafting!!
TINA Stanczak
Facebook |     Emptynest   Scrapin   (private group for project instructions)


Wednesday, April 29, 2020

Custom Titles with Cricut

WELCOME FELLOW PAPERCRAFTERS! 


I have been working on a workshop creating 4 double page layouts using the new CTMH Aurora Paper Packet and Cricut design files.

Today I am going to show how to create a cutom title.

First, I choose a CTMH banner image.  Choosing this image is way harder than it needs to be (lol).  I know the image is part of the Close to My Heart Artistry collection so I search for this collection.

Once I find the collection, I click on the collection to open it.

As shown in the picture, I will now see the images in the collection.  I will need to scroll to find the banner I want to use.
I "insert" the Hexagon Banner image into my design space file.


Next, I ungroup the background from the front.

This will allow me to add a title to the banner.  Next I insert the text I want.
After inserting the text, I move it on top of the banner and adjust the size to fit the banner.
After the sizing is correct, I choose both the text and the banner by clicking on them in the right side bar.

I need to choose both images so I can "slice" the words from the banner using the slice button at the bottom right of the side bar.

Now move the words away from the banner and delete the words.

Lastly move the banner back on top of the background. Your custom title is complete.


More tomorrow on my Alaska album.

Stay well and Happy crafting!!
TINA Stanczak
Facebook |     Emptynest   Scrapin   (private group for project instructions)

Tuesday, April 28, 2020

National Scrapbooking Day (NSD) Schedule

WELCOME FELLOW PAPERCRAFTERS! 


Today I would like to talk a little about National Scrapbooking Day (NSD). Close to My Heart has now published the schedule.  I have included it below.  IMPORTANT NOTE: times are in MST so our day together will begin at noon.  

I am hoping you will join me on the facebook live.  I will be watchig for PMs (private messages) as we put the projects together. As always, I am here to help you. 

Check out my blog post on April 13 covering the Blue Skies Project 

We will have a full day of crafting fun!!

See you soon!!
TINA Stanczak
Facebook |     Emptynest   Scrapin   (private group for project instructions)

Friday, April 24, 2020

Flashback Friday

Hi all,

I was flipping through my Family Legacy album today when I ran across this oldie but goodie. 

I think I made this layout of my in-laws circa 2009, using a paper packet called Vintage Travel. That would make this layout 11 years old-ish. This layout still looks as good as the day it was made! None of the paper or ink is faded. None of the adhesive has come undone.
Close To My Heart makes the Best Products ever for memory keeping.


Stay well and Happy crafting!!
TINA Stanczak
shop |    http://emptynestscrapin.closetomyheart.com
Pinterest |    https://www.pinterest.com/niallsmama
Facebook |     Emptynest   Scrapin   (private group for project instructions)

Thursday, April 23, 2020

Sneak Peak - Alaskan Cruise / Aurora

WELCOME FELLOW PAPERCRAFTERS! 


I am still working away at my Alaska album.  Currently I am working a paper packet that will be released on May 1, so I will not be showing full layouts until that date.  That said I am giving a quick sneak peak today.  I am in love again.  These colors ae so prefect for an Alaskan Cruise.


Stay well and Happy crafting!!
TINA Stanczak
Facebook |     Emptynest   Scrapin   (private group for project instructions

Wednesday, April 22, 2020

NSD Project 4 National Scrapbooking Day Scrapbooking Bundle

Hi all,

Yesterday evening I received word that the NSD CTMH Project 4 National Scrapbooking Day Scrapbooking Bundle is close to selling out.  

For that reason, we are going to take a quick look today at all of the layouts contained in the kit. 
There are enough supplies to create six 12" × 12" two-page layouts.

Here are all of the layouts in the kit. 


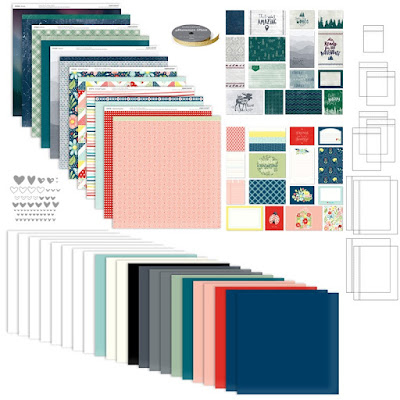
This kit contains:
1 – Aurora Paper Packet (X7256B)
1 – Stitched Together Paper Packet (X7257B)
22 – cardstock sheets (1 Black, 1 Candy Apple, 1 Charcoal, 2 French Vanilla, 1 Glacier, 2 Peach, 1 Peacock, 2 Pewter, 1 Sage, 2 Sapphire, 8 White Daisy)
1 – Aurora Picture My Life™ Cards (X7256D)
1 – Stitched Together Picture My Life™ Cards (X7257D)
1 – Grey Acrylic Hearts (exclusive)
1 – Gold Shimmer Trim (Z1985)
1 – 2" × 2" Flip Flaps™ Memory Protector
2 – 3" × 3" Flip Flaps™ Memory Protectors™
3 – 3" × 4" Flip Flaps™ Memory Protectors™
4 – 4" × 6" Flip Flaps™ Memory Protectors™
photo placeholders


Additional supplies needed:
Black Journaling Pen (.01) (Z3515)
Thin 3-D Foam Tape (Z2060)
Glue Dots® Mini Dots (Z2089)

More tomorrow on my Alaska album.

Stay well and Happy crafting!!
TINA Stanczak
Facebook |     Emptynest   Scrapin   (private group for project instructions)

Tuesday, April 21, 2020

Alaska Album - Glacier Trek

WELCOME FELLOW PAPERCRAFTERS! 


My next layout for Alaska is random.  Lol, so against my nature.  The thing is after a full week of working on my album with "nothing to show for it", I wanted to actually finish a layout.  When I get to this point, I make a workshop with complete instructions.  Using a workshop from one of my sister consultants always helps me not only complete a layout but also get my mojo back.

Today I chose to do another layout created by Miss Carrie of Miss Carries Creations.  I fell in love with her "My Happy Place is Outdoors" kit the first time I saw it, which was well after June. I am sure I saw it sometime in September, after we arrived home from our trip.  I looked at the layout and thought to myself, "Those colors would go perfect with the purple rain slicker I was given to wear on our Glacier Trek!"  So it was meant to be

Here is my "Glacier Trek" layout without the photos.

Love, love, love all the little details on the title.  I added doodling, foam tape to pop it up and clear shimmer brush to give it a little eye catching shimmer.  


I also love the little details on the hiking boot. I inked the edges, used brown marker to add the laces and black marker to the stitches on the boots.


I love the little details on the mountains like using the clear shimmer brush to add snow on the mountains and using foam tape to pop the trees up and add depth to the scenery. 

Come back tomorrow for more info on the National Scrapbooking Day Scrapbooking Bundle.

Stay well and Happy crafting!!
TINA Stanczak
Facebook |     Emptynest   Scrapin   (private group for project instructions)

Monday, April 20, 2020

Alaska Album - Totem Park

WELCOME FELLOW PAPERCRAFTERS! 


My next layout for Alaska is also for the first port of call, Ketchican. 

I feel like I am finally to the point where I am reliving our wonderful anniversary cruise as I am finally pulling together the layouts and picking the photos to print. YEAH!! And working with the wonderful Close To My Heart Into the Wild paper packet and coordinating complements is making my heart smile. 

Following our wonderfully wet Rain forest hike complete with fresh salmon spread "(Yum, delicious)" we visited a quaint little totem park.  We learned a bit about totem pole carving like the fact the poles are a bit like a book in that they are carved not for worship but to tell a story or history of the people carving them. 

I wanted to mention that this layout was inspired by .  I used her layout as my sketch and changed up the papers used and accents to match my photos.

Following my process, I simply click on the link in my spreadsheet to get to my inspiration layout, then I pull together my own layout.  My process is;
Step 1 gather photos.
Step 2 outline album.
Step 3 gather inspiration from Pinterest and scrapbooking blogs.
Step 4 put together the base pages/accents
Step 5 print pictures and attach to base pages
Step 6 add the bling/pop to each layout

Here is the "Totem Park" layout without the photos and the "pop".

When I add the pictures to the left side, I will add the place and date on the space above "Into the wild".  I am not sure I am going to leave the I spy adventure ahead PML (Picture My Life) card in to space. I will most like find another way to add "pop" to this layout.
I used a PML card on the right side of the layout also.  I cut the mountains off a PML card for an accent on the page since the words on the card didn't match I needed a matching accent.

It's a process, lol.  If I had my pictures printed I would add them today with all of the accents then put them straight into the album.  No worries, I will get there.

Come back tomorrow for more Alaska Album layouts and just like on the Mickey Mouse club, it will be Guest Star Tuesday.

Stay well and Happy crafting!!
TINA Stanczak
Facebook |     Emptynest   Scrapin   (private group for project instructions)

Sunday, April 19, 2020

Alaska Album - Sail Away Layout

WELCOME FELLOW PAPERCRAFTERS! 


After 4 days of planning, I have finally started putting layouts together. As I stated in an earlier blog post, I am a chronological girl when it comes to vacation albums.  

I also have a "process" for pulling together my scrapbook layouts. First I put together the base pages.  Next I lay down the photo mats and/or "Place photo Here" cards.  Then I add my title and any die cut embellishments.  It is similar to putting on makeup.  First the base, then the eyshadow and blush followed by the pop (mascara, eyeliner, and lipstick).  Only after I have my photos printed and on the page do I add the "pop".

Here is the "Sail Away" layout without the photos and the "pop".


Yes, it looks very plain right now.  I spent a lot of time figuring out how to "mat" the Cricut title with a larger Cricut cut.  I tried 5 ways to Sunday then finally got it to work.  I did take notes while I was doing it but when I tried to repeat on a second title, no success.  So I am leaving mastering of matting titles in Design Space for another day.


Come back tomorrow for Alaska Album layouts.

Stay well and Happy crafting!!
TINA Stanczak
Facebook |     Emptynest   Scrapin   (private group for project instructions)

Saturday, April 18, 2020

Sneak peak at Aurora paper kit - NSD Project 5

WELCOME FELLOW PAPERCRAFTERS! 


Today I am taking a quick look at NSD CTMH Project 4 National Scrapbooking Day Scrapbooking Bundle which gives a sneak peak at the Aurora paper kit.  Perfect fit for layouts for my Alaska album.

There are enough supplies to create six 12" × 12" two-page layouts.

This kit contains:
1 – Aurora Paper Packet (X7256B)
1 – Stitched Together Paper Packet (X7257B)
22 – cardstock sheets (1 Black, 1 Candy Apple, 1 Charcoal, 2 French Vanilla, 1 Glacier, 2 Peach, 1 Peacock, 2 Pewter, 1 Sage, 2 Sapphire, 8 White Daisy)
1 – Aurora Picture My Life™ Cards (X7256D)
1 – Stitched Together Picture My Life™ Cards (X7257D)
1 – Grey Acrylic Hearts (exclusive)
1 – Gold Shimmer Trim (Z1985)
1 – 2" × 2" Flip Flaps™ Memory Protector
2 – 3" × 3" Flip Flaps™ Memory Protectors™
3 – 3" × 4" Flip Flaps™ Memory Protectors™
4 – 4" × 6" Flip Flaps™ Memory Protectors™
photo placeholders

Here is the sneak peak at the layouts using the Aurora paper kit.  I can't wait to use this paper for my Alaska album.


Isn't the paper just gorgeous?!  I love both the starry night and the northern lights papers.  I am already dreaming of the layout with my Northern lights photos on it.

Additional supplies needed:
Black Journaling Pen (.01) (Z3515)
Thin 3-D Foam Tape (Z2060)
Glue Dots® Mini Dots (Z2089)

Here is one last layout using the Aurora paper kit.

More tomorrow on my Alaska album.


Stay well and Happy crafting!!
TINA Stanczak
Facebook |     Emptynest   Scrapin   (private group for project instructions)