WELCOME FELLOW CRAFTERS!
Today I am working on a Birthday card for my DD (darling daughter) who is turning 21 on Monday. I wanted to do a special card for her, since turning 21 in the middle of a pandemic is... well... let's face it, it kind of sucks. I happened to see this card on Pinterest that I knew she would love...so I scraplifted it.
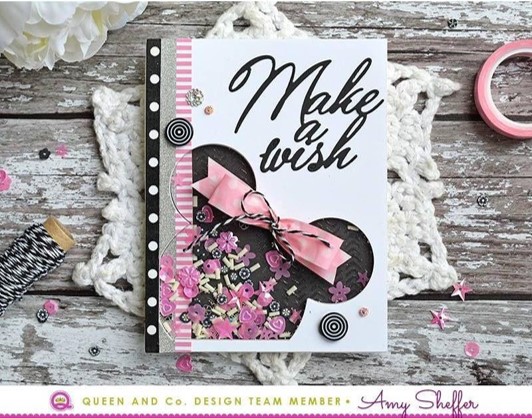
I dug into my Queen & Co stash to pull out;
- my MAGIC HEAD DIE
- a retired MOUSE HEAD card kit which contained the pre-cut foam and an acetate sheet
- some washi tape
- some "toppings", i.e. blingy bits
- and my MAGICAL Charactors paper pad
- Washi tape, Silver Shimmer Trim, and bling (on top of)
- shiney cardstock with the mouse head cut out of it (part of Mouse Head card kit)
- Acetate (part of Mouse Head card kit)
- Foam (part of Mouse Head card kit)
- shaker fillings
- Black Mouse head patterned paper (MAGICAL Charactors paper pad)
I attacked the layers from the bottom and the top moving to the center. Let me explain.
- First, I adhered the Mouse Head patterned paper to the card base.
- Next, I adhered the skinny pink washi tape (from CTMH Calypso collection - retired) to the far left edge of the shiney cardstock with the mouse head cut out of it
- I then adhered the Silver Shimmer Trim on the left hand side of the card top, butted up next to the pink washi tape
- Finally, I added a 3/8 in strip of the pink and black striped paper next to the Silver Shimmer Trim
With this prep finished, we are ready for the tricky part. In order to get the washi layer both on the top of the card and inside the shaker, we have to use the MAGIC HEAD DIE. I used washi tape to hold the card top (i.e. the shiney cardstock with the mouse head cut out of it) to the MOUSE HEAD DIE.

Unforunately, I laid the die on top of the card base to take the picture. I am hoping you get the idea. I the put the die through my Cuttlebug to cut the paper strip from the cut top.
Next, I adhered the shimmer trim and striped cardstock piece to the base of my card, using the MOUSE HEAD DIE as the template to show me where to glue these peices down (left side of picture below). I added the foam cutout to the card as shown in the picture on the right.

Ok, now we are ready to add toppings to the shaker. I wanted to get a good mix of colors in the toppings. In the end I decided on some silver tinsel (from Magic Scraps circa 2006?), dark pink diamonds (Queen & Co), light pink diamonds(Queen & Co), and star sequins from CTMH. I really wanted the star sequins so I picked them out of.the pack of Gold - Loose Sequins. Refer to the picture below for a close up of the toppings I used.

I remove the protective cover from the top of the top before adding the toppings to make sure I don't spill any of the toppings when pulling the cover off. I quickly add my acetate to the foam after I put the toppings in the foam. Again, this ensures I don't spill the toppings out of the foam.

The picture on the left shows my topping mix. The picture on the right show the card with the acetate attached. Before I add the card top, I make sure to smush any air pockets that have formed between the foam and the acetate. Finally, we add the shiney white cardstock top with the mouse head cut out of it.

I found a piece of pink ribbon I used for the bottom bow, adding a Striped Ribbon Bow for the top bow. I added a couple of black dots and pink hearts from Queen & Co pink sequin topping bottle.
The last step was adding my "Finaly 21" greeting and birthday saying on the inside of the card. I had intended on cutting the "Finally 21" saying out with my Cricut but I couldn't find my Black Glitter Paper so I ended up using the retired Glamour Glitter Alphabet stickers from CTMH to add my saying. I added the "Cheers" saying along with the champange glasses and bubbles to the inside of the card using the Nov 2016 SOTM "New Years Cheers".

After looking the card over, I wasn't happy with the placement of the saying on the front, because I was thinking the "Finally 21" was too high up and there was too much white space between the saying and the Mouse Head......so as a final touch I added some champange bubbles.
I am now so happy with this card! I can't wait to give it to my DD on her birthday; right before I take her wine tasting.
If you are in need of a special card, reach out to me via FB messenger. I would love to create a custom card for your special occasion.
Stay well and Happy crafting!!
TINA Stanczak
Pinterest | https://www.pinterest.com/niallsmama
Cricut Affiliate link | TinaStanczakCricutAffiliateLink
No comments:
Post a Comment