Showing posts with label Birthday card. Show all posts

Friday, August 28, 2020

Finish It Friday - Final CTMH new product sneek peek (Happy Anniversary/Birthday card)

  WELCOME FELLOW CRAFTERS!

It's Finish It Friday. Today, I am continuing with the sneak peaks into the CTMH Sep. 2020 to Aug. 2021 catalog. I wanted to make a couple more cards using the same color pallet from the "Party Time Paper Packet" that I used for the cards in my Monday and Wednesday posts. It may seem like I am on a card binge, because I am. My goal was to finish a Birthday card for every single person on my Birthday list. As fate would have it, the minute I finished the birthday cards three of my friends had wedding Anniversarys. So here I am, working on cards, not scrapbook layouts.

Here are today's cards.

For the cards on the left I used the confetti patterned paper on the layout base, with highlights of nectarine cardstock and raspberry cardstockFor the cards on the right I used the confetti patterned paper on the layout base, with highlights of nectarine cardstock and raspberry cardstock. These are the same patterned papers I used for Monday's cards, just larger pieces of the paper. Hopefully, this will give you a better idea of what the paper looks like when used on a project. 

Here is a close up of the 1st card.

It's hard not to love the versatility of the Wishing You Everything Stamp & Thin Cut (Z3779) set. The "HAPPY", "anniversary" and "heart" are all stamped from this set.

Here is the close up of the second card.

You can literally make a card or scrapbook layout for any occasion using this stamp set and paper packet.

Here is the list of product used.
I am off to mail my cards and then on to scrapbooking more of those 21st birthday pictures. Check September 1st for the offical new product launch!! So many new products, so little times.  

Stay well and Happy crafting!!
TINA Stanczak
Cricut Affiliate link  | TinaStanczakCricutAffiliateLink
Facebook |     Emptynest   Scrapin   (private group for project instructions)

Monday, August 24, 2020

Motivation Monday - Close To My Heart new product sneek peak (Girlie Cards)

  WELCOME FELLOW PAPER CRAFTERS!

It's movtivation Monday. Today, I am continuing with the sneak peaks into the CTMH Sep 2020 to Aug 2021 catalog. The more I use the "Party Time Paper Packet", the more I fall in love with it!! One of the key features of this paper packet is the versatilty of the patterns.  Today and tomorrow, I will be featuring cards and layouts using pinks, orange and yellow. Later in the week I will feature cards and layouts using greens, blues and yellows.

Here are today's cards:


Both cards use pink dot paterned paper and pink/orange patterned paper on the base, with highlights of nectarine cardstock and raspberry cardstock. If you look closely at the "Anniversary" and "Birthday" sayings stamped in Raspberry ink on the Lemonade Cardstock, you will note a lighter shade of yellow was used for the "Anniversary" saying:


This is because Close to My Heart cardstock has a white core with a light shade on one side and a darker shade on the other side. You get a "twofer" or two colors on a single sheet of paper. Very handy for insuring your colors match while getting a variety of shading.

Here is the list of product used.
  1. Party Time Paper Packer + Sticker Sheet (X8016S - Avaialble Sep 1, 2020
  2. Party Time Coordinating Cardstock (X8016C) - Available Sep 1, 2020
  3. Wishing You Everything Stamp _ Thin Cut (Z3779) - Available Sep 1 , 2020
  4. Raspberry Exclusive Inks
  5. White Cards & Envelopes Value Pack (you will need 1 card base & envelopes)
  6. Thin 3-D Foam Tape

I love that the variety of patterened paper in the packet allowed my to customize the birthday card by using a patterned paper with the words Happy Birthday, written in different colors and sizes behind my "Birthday wishes" sentiment. 


At the same time I was able to quickly change the card design into an anniversary card by using the confetti patterned paper behind my "Anniversay wishes" sentiment.

This patterned paper is great for those girlie occasions, like a princess birthday or bridal shower or anniversary. 
The confetti and "Happy Birthday" colors are so bright and cheerful!! Don't they just remind you of a cake you want to eat right up??

Well, on to scrapbooking some of the 21st birthday pictures.  Check back tomorrow for a girlie birthday layout featuring some more of this wonderful Party Time paper packet and stamp set.  

Stay well and Happy crafting!!
TINA Stanczak
Cricut Affiliate link  | TinaStanczakCricutAffiliateLink
Facebook |     Emptynest   Scrapin   (private group for project instructions)

Friday, August 21, 2020

Finish It Friday - Close To My Heart new product sneek peek (Generic Happy card)

 WELCOME FELLOW CRAFTERS!

Today, I am working on an generic "Happy Card" for any occasion. I never used to make cards, but since I retired and I have so many paper crafting supplies on hand, I set a goal to fill a box with cards so that I never have to run out to the store to buy a last minute greeting card. I think I am the Queen of the last minute greeting card! LOL

I used the following products for today's card:
  1. Party Time Paper Paket + Sticker Sheet (X8016S) - Available Sept 1 2020
  2. Party Time Coordinating Cardstock (X8016C) - Available Sept 1, 2020 
  3. or a 1' by 4" piece of Lemonade Cardstock and a 4" by 5.25" piece of Lagoon Cardstock
  4. Acrylic Shapes - Yellow Stars (Z3804) - Available Sept 1, 2020
  5. Wishing You Everything Stamp + Thin Cut (Z3779) - Available Sept 1, 2020
  6. White Cards & Envelopes Value Pack (you will need 1 card base & envelopes)
  7. Thin 3-D Foam Tape
  8. Z2895 Lagoon Exclusive Inks™ Stamp Pad
  9. Z2848 Sapphire Exclusive Inks™ Stamp Pad
Since I had all of the supplies pulled out to make the aniversary card, I stamped several of the "Happy" in Lagoon ink with the Sapphire Ink "Happy" graphic on top. I had also stamped and cut several of the tiny rectangles using Lagoon Ink. I used these pre-stamped items to make this cute generic card.


I am so excited to be playing with a few of the new products being offered by CTMH for the Sep 2020 to Aug 2021 year. One of the big changes that CTMH made for this years catalog is the fact that there now "core paper packs"...meaning these paper packs will be available throughout the whole year. The Party Time Paper Packet  + Sticker Sheet (X8016S - Available Sept 1 2020) is one of the new core paper packs. This means that no matter in which month of the year your special celebration is held, you will be able to purchase the paper packet and make your scrapbbok layouts right away, with no waiting. Here is the sneak peek of the paper paket.

This paper packet is so versatile. For instance, the present patterned paper features pinks and oranges on one side and blues and greens on the other side. The present patterned paper also features different color sets on the A side vs the B side. Or, how about the the Happy Birthday words on one side of the paper and the confetti on the other side of the paper?  Wouldn't the confetti be cute for a New Years layout or a school dance layout (maybe Homecoming??). And the stripes or the dots, those patterens can be used for virtually anything!!

Take a look at the Acrylic Shapes - Yellow Stars (Z3804) up close.

There is so much depth to these. They will add a nice pop to any greeting card or scrapbook layout. Hint: be on the lookout for the new core catalog as there will be many choices for similar Acrylic Shapes.

Be on the lookout for more sneak peeks next week!! I have a whole weeks worth of peeks planned!!

Stay well and Happy crafting!!
TINA Stanczak
Cricut Affiliate link  | TinaStanczakCricutAffiliateLink
Facebook |     Emptynest   Scrapin   (private group for project instructions)

Saturday, August 15, 2020

Stash Busting Saturday - Finally 21 Birthday Card

 WELCOME FELLOW CRAFTERS!


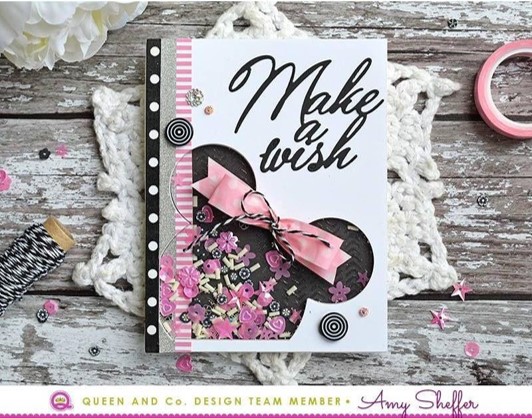
Today I am working on a Birthday card for my DD (darling daughter) who is turning 21 on Monday.  I wanted to do a special card for her, since turning 21 in the middle of a pandemic is... well... let's face it, it kind of sucks. I happened to see this card on Pinterest that I knew she would love...so I scraplifted it.


I dug into my Queen & Co stash to pull out;
  1. my MAGIC HEAD DIE 
  2. a retired MOUSE HEAD card kit which contained the pre-cut foam and an acetate sheet
  3. some washi tape
  4. some "toppings", i.e. blingy bits
  5. and my MAGICAL Charactors paper pad
Making this card was tricky because the washi was both on top of the "sandwich" and inside the "sandwich". Let me explain. First let's review the full "sandwich"/layers
  1. Washi tape, Silver Shimmer Trim, and bling (on top of)
  2. shiney cardstock with the mouse head cut out of it (part of Mouse Head card kit)
  3. Acetate (part of Mouse Head card kit)
  4. Foam (part of Mouse Head card kit)
  5. shaker fillings
  6. Black Mouse head patterned paper (MAGICAL Charactors paper pad)
I attacked the layers from the bottom and the top moving to the center. Let me explain. 
  1. First, I adhered the Mouse Head patterned paper to the card base. 
  2. Next, I adhered the skinny pink washi tape (from CTMH Calypso collection - retired) to the far left edge of the shiney cardstock with the mouse head cut out of it
  3. I then adhered the Silver Shimmer Trim on the left hand side of the card top, butted up next to the pink washi tape
  4. Finally, I added a 3/8 in strip of the pink and black striped paper next to the Silver Shimmer Trim
With this prep finished, we are ready for the tricky part. In order to get the washi layer both on the top of the card and inside the shaker, we have to use the MAGIC HEAD DIE. I used washi tape to hold the card top (i.e. the shiney cardstock with the mouse head cut out of it) to the MOUSE HEAD DIE.

Unforunately, I laid the die on top of the card base to take the picture. I am hoping you get the idea. I the put the die through my Cuttlebug to cut the paper strip from the cut top. 

Next, I adhered the shimmer trim and striped cardstock piece to the base of my card, using the MOUSE HEAD DIE as the template to show me where to glue these peices down (left side of picture below). I added the foam cutout to the card as shown in the picture on the right.


Ok, now we are ready to add toppings to the shaker. I wanted to get a good mix of colors in the toppings. In the end I decided on some silver tinsel (from Magic Scraps circa 2006?), dark pink diamonds (Queen & Co), light pink diamonds(Queen & Co), and star sequins from CTMH. I really wanted the star sequins so I picked them out of.the pack of Gold - Loose Sequins. Refer to the picture below for a close up of the toppings I used.

I remove the protective cover from the top of the top before adding the toppings to make sure I don't spill any of the toppings when pulling the cover off. I quickly add my acetate to the foam after I put the toppings in the foam. Again, this ensures I don't spill the toppings out of the foam. 

The picture on the left shows my topping mix. The picture on the right show the card with the acetate attached. Before I add the card top, I make sure to smush any air pockets that have formed between the foam and the acetate. Finally, we add the shiney white cardstock top with the mouse head cut out of it.


I found a piece of pink ribbon I used for the bottom bow, adding a Striped Ribbon Bow for the top bow. I added a couple of black dots and pink hearts from Queen & Co pink sequin topping bottle.

The last step was adding my "Finaly 21" greeting and birthday saying on the inside of the card. I had intended on cutting the "Finally 21" saying out with my Cricut but I couldn't find my Black Glitter Paper so I ended up using the retired Glamour Glitter Alphabet stickers from CTMH to add my saying. I added the "Cheers" saying along with the champange glasses and bubbles to the inside of the card using the Nov 2016 SOTM "New Years Cheers".

After looking the card over, I wasn't happy with the placement of the saying on the front, because I was thinking the "Finally 21" was too high up and there was too much white space between the saying and the Mouse Head......so as a final touch I added some champange bubbles.

I am now so happy with this card! I can't wait to give it to my DD on her birthday; right before I take her wine tasting.

If you are in need of a special card, reach out to me via FB messenger. I would love to create a custom card for your special occasion.

Stay well and Happy crafting!!
TINA Stanczak
Cricut Affiliate link  | TinaStanczakCricutAffiliateLink
Facebook |     Emptynest   Scrapin   (private group for project instructions)

Saturday, July 25, 2020

Stash Busting Saturday - Quick Birthday cards

WELCOME TO ART CAMP WEEKEND!

Hi all.Today my daughter and I have setup "art camp" in our family.room. I thought I would whip out some quick birthday cards to get the creative juices going.

Since it is Stash busting Saturday, I dug deep into my craft room to pull out a drawer of washi, some Queen & Co Twinkle drops, and a couple of stamp sets from Close To My Heart with the intention of making a couple of cards that have been stuck in my head for years. 


The two stamps sets I pulled out of my stash were:
  1. S2005 Time for Celebration Stamp of The Month (SOTM)
  2. D1903 Celebrate Today—Scrapbooking

I also pulled the retired Gypsy ink out of my stash. I love the versatility of the Time for Celebration Stamp of The Month. It can be used for Birthday, Graduation, Wedding Anniversary, Mothers day, Fathers day, ....just about any occasion.


These cards were easy, peasy. For the first card, I grabbed all the purple washi and put some pieces down to represent candles, then I added the Queen & Co Twinkle drops. Lastly l stamped the Happy Birthday from S2005 Time for Celebration Stamp of The Month (SOTM) on the outside and the larger Happy Birthday from D1903 Celebrate Today—Scrapbooking on the inside of the card.

For the second card, I grabbed a set of thin washi and put some pieces down to represent a birthday cake then added candles to the top of the cake, completing with Queen & Co Twinkle drops. Lastly l stamped the larger Happy Birthday from D1903 Celebrate Today—Scrapbooking on the inside of the card.


I hope this inspired you to break out some supplies you have in your stash and make something. It can be fun to rediscover some of those purchases you had tucked away and get the creative juices going. I am thinking I might repeat these two ideas on birthday scrapbook pages......because they are so easy and yet so cute!!

Time to go create some art for Christmas in July week!! Yep, next week is Christmas in July week. We have the Hallmark channel on and we are soaking in those Christmas vibes. We may be breaking out the hot chocolate soon!! Enjoy your weekend!

Stay well and Happy crafting!!
TINA Stanczak
Cricut Affiliate link  | TinaStanczakCricutAffiliateLink
Facebook |     Emptynest   Scrapin   (private group for project instructions)

Saturday, July 18, 2020

Stash Busting Saturday - July STOM Birthday cards

WELCOME TO BIRTHDAY BASH WEEK!

Today, for Stash busting Saturday, I am continuing to highlight the July Stamp of The Month (SOTM) from Close To My Heart. As I was cleaning off my work area, I had an idea for another card, using some of the bits and pieces I was about to put away. 

I looked thru my stamp collection and came up with this gem. It is the Febuary Stamp of the Month (SOTM) from 2018, Sunny Thoughts.


I stamped the insides of the cards with the "Birthday Wishes" saying. 


I added the sorbet butterfly patterned paper from Mix In (X9013) on the card base, than added the girl with the bouquet coloring all the flowers with the Coral TriBlend™ Marker, as shown below.


  • Fair Skin TriBlend™ Marker for the arms
  • Dull Green TriBlend™ Marker for the leaves and stems
  • Coral TriBlend™ Marker flowers
  • True Blue TriBlend™ Marker flowers


  • I colored a second card in a very similar manner, changing up the way I edged the card. On the second card, I rubbed the edge of the card on the stamped image.  I think I like the thicker outline better. What about you?


    I dug into my stash of gems and found some gems Circa 2013? Maybe 2011? and popped them on the centers of the flowers. Not sure if you can see in the picture but there are some itty bitty gems in the centers of the small flowers.

    Today's cards may be my favorite of the whole week. Glad I searched thru my stamps and sparkles to find some oldies but goodies. Hope you can find some fun "gems" in your stash!!

    See you next week for scrapbook layouts, featuring ???

    Stay well and Happy crafting!!
    TINA Stanczak
    Facebook |     Emptynest   Scrapin   (private group for project instructions)

    Friday, July 17, 2020

    Finish It Friday - July Stamp of The Month (SOTM) Generic Card

    WELCOME TO BIRTHDAY BASH WEEK!

    Today, for Finish it Friday, I am continuing to highlight the July Stamp of The Month (SOTM) from Close To My Heart. I had stamped some random images to color earlier in the week while I was working on the other cards, so today I am going to use those images to make some cards with a hope of being able to clean up my work space and move on to a new project. 

    Here are the few extra images that I wanted to clean off my desk. 
    I started with the 2 bouquets on the sheet with the butterfly. I colored the bouquets exactly the same as Wednesday card, using the Coral TriBlend™ Marker for the big flowers. I loved the way the butterfly paper looked on the base of Wednesday's card so I used the butterfly paper as the base of todays cards.

    I fussy cut the boquets and popped them into a homemade envelope. The envelope was made using a sheet a patterned paper from the same March April Mix In paper packet (X9013). 
    I added a touch of gold thread and white/gold ribbon to finish off the card.

    The second card is much the same except I made the envelope a little smaller and flipped the paper over the tiny stripes are on the outside of the envelope.
    I thought I would like the card better with the envelope this way.

    Which do you like better?

    I still had a couple of images to use. I decided to use Tuesday's technique of round the card stamping for the purple butterflies. The below pic shows the card front as I am coloring it in.

    Here is the card front before adhering the monochromatic butterflies.
    Here is the finished card.
    Well, I think I am finished for the day. I am just going to pop this butterfly and girl with her bouquet into the envelop with the stamps. Maybe I will have a use for them later.

    See you tomorrow for "Scrap your Stash" Saturday.

    Stay well and Happy crafting!!
    TINA Stanczak
    Facebook |     Emptynest   Scrapin   (private group for project instructions)