Showing posts with label Gringotts Scrapbook layout. Show all posts

Tuesday, June 23, 2020

Technique Tuesday - Animal Kingdom Rivers of Light (Using Patterned Paper in Cricut layouts )

WELCOME TO BRUSHED WEEK!

Today I continue to highlight the Brushed / Animal Kingdom workshop I designed while at the same time showing you my technique for artfully highlighting patterned papers with Cricut cuts.

This week I am using the Brushed paper packet to create layouts for Disney's Animal Kingdom. Brushed is an older paper packet that was "refreshed" with new colors and brought back by popular demand. The first time I saw the Bohek patterned paper, I thought of the Rivers of Light show at Disney's Animal Kingdom.

What is Bohek? In photography, bokeh is the aesthetic quality of the blur produced in the out-of-focus parts of an image produced by a lens. Bokeh has been defined as "the way the lens renders out-of-focus points of light".


You can see the points of light on the paper, with the blurred edges of those points of light. I couldn't think of a more perfect pattern for use in a "Rivers of Light" layout. At the same time, I knew I want to bring in the lotus image, so here is two page 12x12 River of Light Scrapbook Layout as I set it up in Design Space.
My vision was that all of the lotus pieces would be cut from a single sheet of the Bokek paper as follows:
1) the left most floating lotus mostly yellow
2) the middle lotus on the left page some yellow fading into pink
3) the middle lotus on the right page mostly pink
4) the right most lotus on the right page some pink fading into yellow
5) the top cluster of lotus of pink so the yellow titlw shadow would not be lost in the lotus

When Cricut lined up the images to be cut, here is what I got.
First of all, design space spread the cuts across 2 sheets of paper with a lot of wasted space. Second of all, the lotus's were not aligned on the paper to cut giving me the colors I had envisioned.  So I moved the cuts.

1) I pulled the images of the 3 welded lotus's for the title to the bottom of the sheet to move it out of the way
2) I pulled one of lotus images up to the top left and rotated toward the left top corner to get the a lot of yellow into the cut
3) I pulled one of lotus images up to the top right and rotated toward the left top corner to get some pink fading into yellow for the cut

4) Next, I had to move the 2 lotus images from mat 4 to mat 3
  • Choose the image on mat 4 
  • Click on Move Object
  • You will be given a choice of mat to move the object to. Choose Mat 3.
  • When the check mark is shown on Mat 3, click the confim button.
  • Cricut will place the image at the top left corner. Move the image so it face the lotus in the right hand top corner, thus placing it to cut with yellow on the left side and pink on the right side.
  • Repeat the steps to move the second 2 lotus images mat 4 to mat 3. This time, place the lotus under the first lotus in the left hand top corner.
Click on Move Object

Choose Mat 3
Confirm choice of mat
After moving to mat place image as required
This is what the image placement on my mat looked like before I cut.
I had my images very close but not overlapping. 
VERY IMPORTANT!! 
1) Make sure that none of your images are touching each other before cutting!
2) Make sure you put the mat in the Cricut with the yellow portion of the paper going in first, or your images will be cut upside down (standing on their heads)
3) Leave enough paper to cut the hibiscus flowers for the Stitch layout
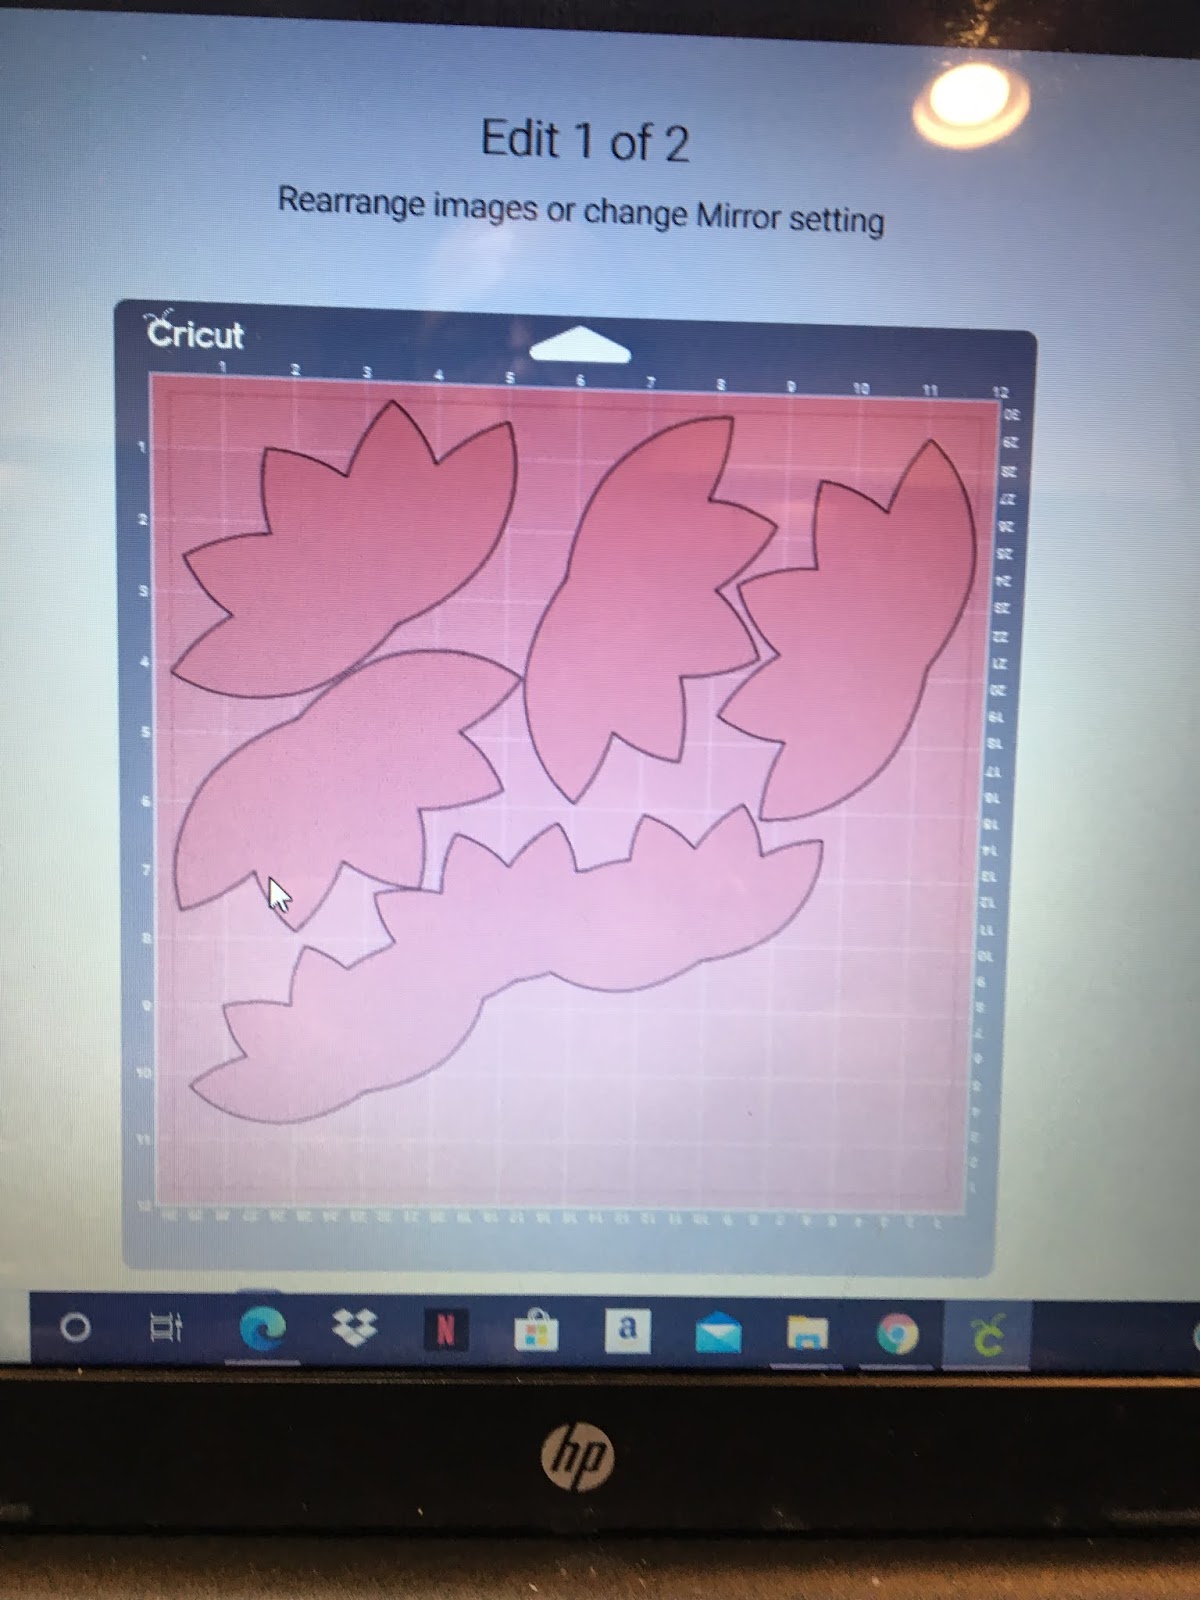
It is also important to make sure you have enough paper in the bottom right to cut the flowers for the Stitch layout.  I put the bottom layer of the hibiscus flowers slong the bottom edge where it is very dark red. I cut the 2 pixie hibiscus flowers from the pink section along the right edge.
Some of you might be asking WHY??

Well, if I had cut the layout using plain cardstock, it would be kind of boring. Using patterned paper for you Cricut cuts amps up the layout to make it more interesting.

My vision realized:

My vision was that all of the lotus pieces would be cut from a single sheet of the Bokek paper as follows:
1) the left most floating lotus - mostly yellow
2) the middle lotus on the left page - some yellow fading into pink
3) the middle lotus on the right page - mostly pink
4) the right most lotus on the right page - some pink fading into yellow
5) the top cluster of lotus - pink so the yellow title shadow would not be lost in the lotus

Check back tomorrow to see the title for the Rivers of Light layout and Friday (Finish it Friday) for the finished layout.

Stay well and Happy crafting!!
And remember all Cricut and general crafting questions are welcome!!
TINA Stanczak
Facebook |     Emptynest   Scrapin   (private group for project instructions)

Monday, June 22, 2020

Motivation Monday - Cricut Stitch Scrapbook Layout

WELCOME FELLOW PAPERCRAFTERS!


This week (week 15 of COVID 19 isolation) I am working with the Brushed Paper Packet from Close To My Heart. Brushed is an older paper packet that was "refreshed" with new colors and brought back by popular demand. I love the summer colors.  

As you know, I have been working on both Disney scrapbook layouts and my Alaskan Cruise album concurrently,  As I was flipping through my Disney photos, it struck me that these colors would be perfect for our Animal Kingdom photos, especially the new "Pandora" section of the park.   

I started by creating a "Stitch" layout since we have some older photos with Stitch from way back, when Stitch could be found in Camp Minnie / Mickey. Camp Minnie / Mickey was replaced with Pandora. This layout could easily work for Hawaii photos, Disney Aulani, or any cruise photos since the layout has a tropical flavor.

I was hoping that getting this layout completed would motivate me to use the whole paper packet and create some awesome layouts that are currently showing up in my dreams.
  
I used a piece of the brushed leafy pattern paper for my background. I cut the tops of the palm trees out of the brushed green dotted patterned paper. I also cut the bottom layer of the Hibiscus flowers out of the bokeh patterned paper. The patterned papers I used are shown below. The remaining Cricut images were all cut using various colored CTMH cardstock.

All of the Cricut images in the cut file are Close To My Heart images or free images so you DO NOT need a Disney cartiridge to make this layout.
  
When I make my layouts, I don't always cut the colors in the order that Design Space lays out the mats. 
  1. In this case, I cut the Canary (mat #9) first. I inked the edges of the sunshine and adhered to the base of the layout (be sure to cut the branding/zip strip off before adhering the sunshine).
  2. Next I cut the top layer of the surf board and the leaves using the dark side of Green Apple cardstock (mat #10). I inked the edges of all pieces with Green Apple ink.
  3. After this, I moved on to the beach. The beach was cut using both the dark side and light side of toffee card stock. I cut larger portion of the beach (mat #7) with the dark side of toffee card stock. The I turned it over and put the uncut portion of the paper to the top of my cricut mat to cut the smaller portion of the beach and the bottom layer of the palm trees (mat #8) from the light side of the toffee cardstock. I inked both section of the beach with toffee ink (refer to picutre) then adhered the left sides together.  Wait....don't adhere this to the base page yet, as the water needs to be adhered first.
  4. This next step is a little tricky. The palm tree consists of 3 layers (bottom -> cut from the light side of toffee cardstock, middle = leaves, and top layer of tree). The top layer of the tree is mat # 6 (dark brown). I was able to cut the tree trunks from the same sheet of cardstock I cut the beach images from. Before cutting, check two things: 1) make sure the images fit on the paper (spin or move to fit as needed), and 2) make sure the dark side is up. I inked the tree trunks using Expresso PIGMENT ink because pigment ink is very wet and can be used almost like paint. Then I dabbed ink onto the coconuts (refer to picture above). Alternatively, you can cut the tree trunks using Espresso Cardstock
  5. Wanting to finish the palm trees, I cut mat #11 (the tree tops) usng the green dot patterned paper. I inked the tree tops with green apple to give them definition, then moved to the next step before gluing all the palm tree pieces together. Note: I generally wait 15 minutes between inking and gluing to ensure the ink is dry before I glue all the pieces togehter. This is very important with the pigment ink because it will get everything covered in ink if you don't give it time to dry.
  6. I cut the water pieces next. I cut the larger water piece (mat # 12) using the dark side of glacier, then cut the wave (mat #13) using the dark side of Lagoon cardstock. If you like, you could cut the larger water piece using the light side of the lagoon cardstock. I wanted a stronger contrast so I used a lighter color for the water versus the wave. I inked the wave and the top of the water using lagoon ink, then I adhered them together. Before adhering the water to the base sheet, I cut it at the 2 1/4 inch point since it is only 11.5 inches long. I adhered the shorter water piece to the left side and the longer water piece to the right side.
  7. After adhering the water pieces, I glued down the beach and then the palm trees, followed by the surf board. I use this method so I don't lose any peices as I go along.
  8. I moved to the flowers next. As mentioned earlier, I cut the bottom layer of the flowers using the bakeh patterned paper. I cut a 6x4 piece from the darkest portion of the paper (as shown on the right below). Before cutting the images, I changed the mat size (mat #3) to 4x6 as shown on the left below. This forces Design Space to put all the images on the paper,
  9. Having cut the bottom layer of the flowers, I cut the white images (mat #1). I adhered the 3 white flower tops to the bottoms, then inked the edges of the flowers using Pixie ink.
  10. To finish the flowers, I cut the pixie flower images (mat #4). Again I adhered the pixie flowers to the bokah patterned paper, then inked 3 flowers with Pixie ink..
  11. To finish off the flowers, I cut the black next. To avoid losing any of the pistils. I peeled then off the Cricut mat one by one and adhered to the flowers before remvoing the next pistil. After finishing the flowers, I adhered the photo mat, all but the one small white flower and the leaves that go with the flowers.
  12. The last three mats/colors are Ballerina (the insides of Stitchs ears and his tongue),the light blue (dark side of Carolina) and the dark blue (dark side of bluebird). I cut these colors and layered Stitch together. 
The highlights I added to Stich included using the black journalling pen to add his upper lip and outline his nose. I also used a white gel pen to add the whites of his eyes. 

The last steps to the layout are to adhere Stitch and the final flower. 

All in all, I LOVE the way this layout turned out. All of the Cricut images in the cut file are Close To My Heart images or FREE images so you DO NOT need a Disney cartiridge to make this layout.

If you would like to create this layout me, contact me to purchase the Cricut DS file.

Stay well and Happy crafting!!
TINA Stanczak
Facebook |     Emptynest   Scrapin   (private group for project instructions)
However, the Cricut cut files can be used with CTMH cardstock and other items you have in your stash to complete this layout.  

Wednesday, June 10, 2020

Work on It Wendesday - Aurora / Alaska Scrapbook Kit : Northern Lights Layout

WELCOME TO AURORA WEEK! 


Today I continue to highlight the Aurora / Alaskan Cruise workshop I designed by revisiting the Northern Lights layout. 

This workshop creates (8) 12x12 scrapbook pages. I love the rich color combination in this kit. It features the Aurora paper collection from Close To My Heart and creates 8 cruise / outdoor themed scrapbook pages. As I said yesterday, I know so many people who recently went on an Alaskan cruise. This workshop is perfect for capturing your memories of either past or future travels, from cruising to hiking or any other outdoor vacation.

Here are the (8) 12x12 scrapbook pages.

So far I have featured three of the four layouts; Layout 1 : Northern LightsLayout 2: Ocean Views / Glacier Bay and Layout 4: Wild & Free / College Fjord on my blog.

Today I wanted to revisit the Northern Lights layout to show how pretty the paper is with actual photos of the Northern Lights.


Truely, you could use this layout for Northren lights, star gazing, a trip to the palnatarium, or even sitting on the cruise ship balcony with your favorite beverage while star gazing (and of course watching the ocean roll by). Let you imagination run wild!!

Items contained in the precut kit:
This is $32.25 worth of product. Plus Color Photo Instructional Guide of all completed layouts which includes instructions for today's Technique using your Cricut to write on the branding (zip) strip. The Cricut Deisgn Space files are also included in the Instructional Guide.

If you are interested in creating this workshop yourself, simply purchase the Aurora paper packet or PML cards from https://emptynestscrapin.closetomyheart.com/ and I will email you the Color Photo Instructional Guide of all the completed layouts and the Cricut Design Space file links.

Or purchase the Cricut Design Space files for $7.50.  When you purchase the DS files, the Color Photo instructional Guide will be emailed to you with the DS file links.

Simply email niallsmama@comcast.net to purchase a precut kit or efiles, or purchase Aurora products from https://emptynestscrapin.closetomyheart.com and receive the workshop for free.

Stop by again Friday for the final layout from the Aurora/ Alaska Scrapbooking kit.


Stay well and Happy crafting!!
TINA Stanczak
Facebook |     Emptynest   Scrapin   (private group for project instructions

Saturday, May 16, 2020

Stash Busting Saturday - Cricut Gringots Scrapbook Layout

WELCOME TO HARRY POTTER WEEK! 


Today I am finishing up Harry Potter week (week 9 of self isolation). Since I struggled finishing my layout yesterday, I decided to pull up another Harry Potter themed Cricut design space file that I had been saving for a rainy day.  I wanted to complete all the cuts and put the layout together to finish the week feeling a strong sense of accomplishment.

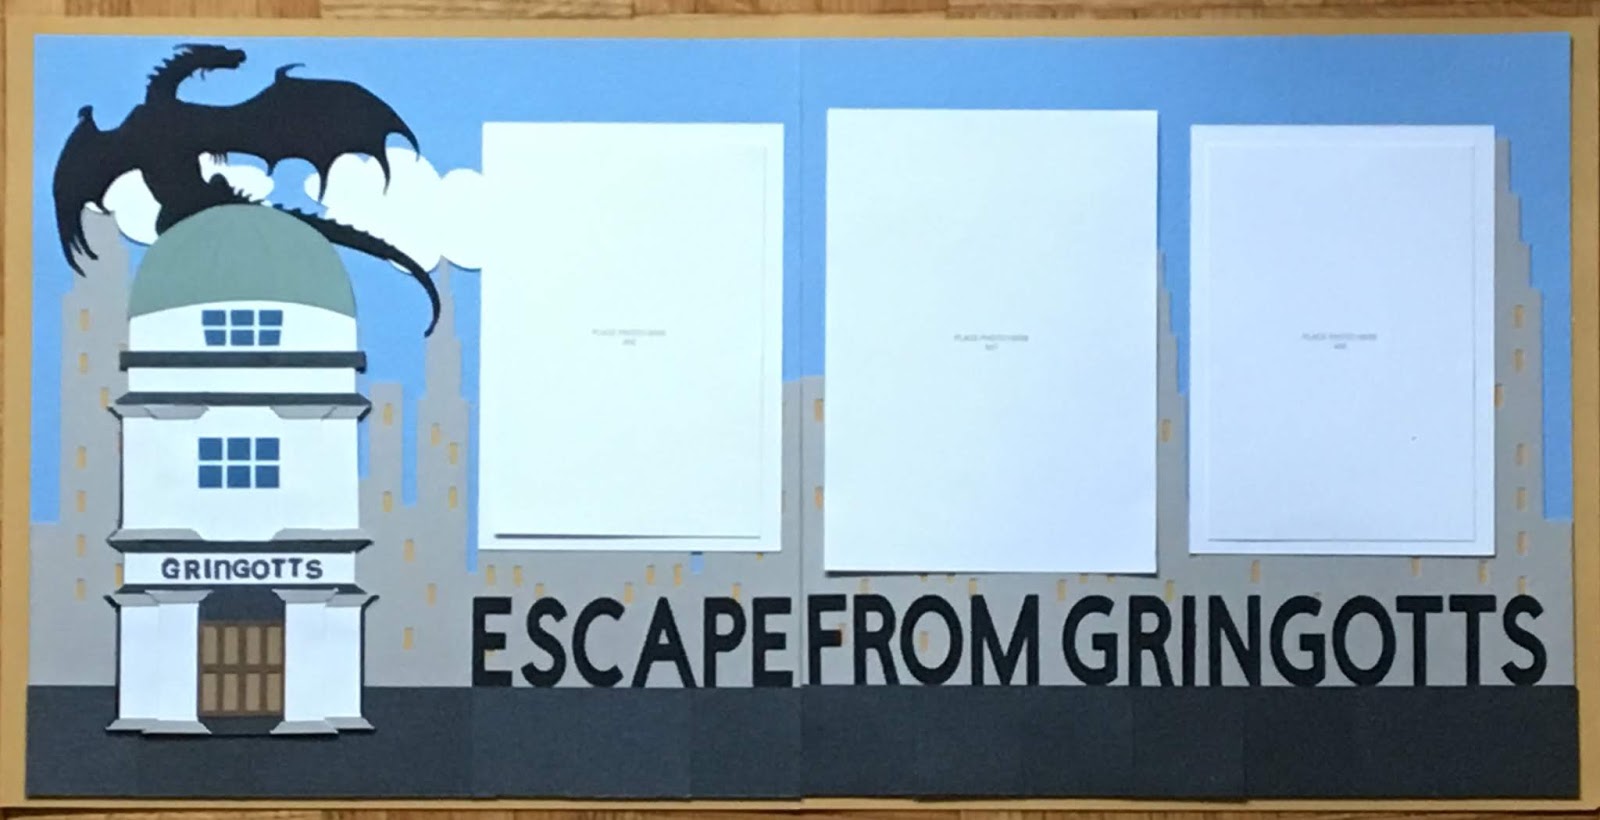
Since it was stash busting Saturday, I pulled out a bin a cardstock given to me by a friend who was downsizing and thus giving up her craft room.  I found what I needed to cut the Gringotts bank from the cardstock bin.  The white cardstock is nicely textured to look like white stucco and the blue cardstock has a pretty shimmer on the building.

The word GRINGOTTS was included in the Cricut cut file but the letters were so small and thin, they did not cut cleanly from the generic black cardstock.  I decided to dig around in my stash for this tiny little letter stamp set called "A typeface". I am not sure how old it is but it comes in quite handy for stamping in tight space.

Here is the completed left side of the layout.
The additional Cricut cuts included a city space, clouds, and squares to build the sidewalk/street anchoring Gringotts.  the right side of the layout is pretty much the space.


Here is the full layout.

I can't wait for my photos to get here (in about 10 days....ugh, so long to wait).  I am planning on adding some flip flaps or expanding the number of photos on the layout in some other manner.  I will show the layout with photos   Check back in a couple of weeks and I will let you know how it goes.

I want to thank you for stopping by today.  I hope my week of Harry Potter layouts has inspired you to either create something Harry Potter themed or bust into your stash!!  And, if you happen to be looking for a ting little Alphabet, I have an extra set of the "A typeface" alpha available.

Check back next week for more never-ending spring break scrapbook layouts.


Stay well and Happy crafting!!
TINA Stanczak
Facebook |     Emptynest   Scrapin   (private group for project instructions)