Showing posts with label Harry Potter. Show all posts

Saturday, May 16, 2020

Stash Busting Saturday - Cricut Gringots Scrapbook Layout

WELCOME TO HARRY POTTER WEEK! 


Today I am finishing up Harry Potter week (week 9 of self isolation). Since I struggled finishing my layout yesterday, I decided to pull up another Harry Potter themed Cricut design space file that I had been saving for a rainy day.  I wanted to complete all the cuts and put the layout together to finish the week feeling a strong sense of accomplishment.

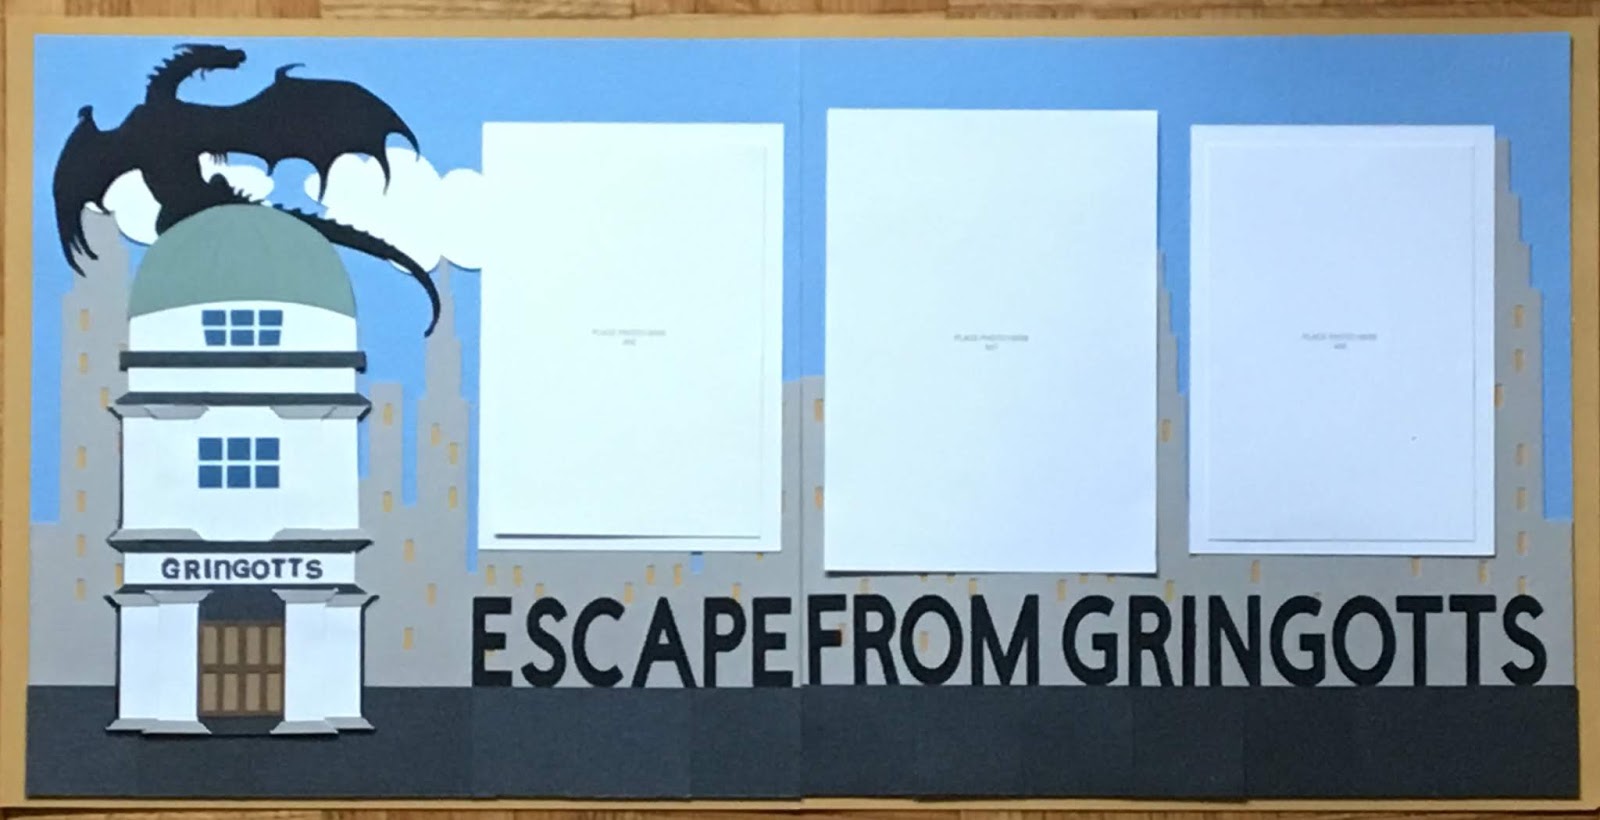
Since it was stash busting Saturday, I pulled out a bin a cardstock given to me by a friend who was downsizing and thus giving up her craft room.  I found what I needed to cut the Gringotts bank from the cardstock bin.  The white cardstock is nicely textured to look like white stucco and the blue cardstock has a pretty shimmer on the building.

The word GRINGOTTS was included in the Cricut cut file but the letters were so small and thin, they did not cut cleanly from the generic black cardstock.  I decided to dig around in my stash for this tiny little letter stamp set called "A typeface". I am not sure how old it is but it comes in quite handy for stamping in tight space.

Here is the completed left side of the layout.
The additional Cricut cuts included a city space, clouds, and squares to build the sidewalk/street anchoring Gringotts.  the right side of the layout is pretty much the space.


Here is the full layout.

I can't wait for my photos to get here (in about 10 days....ugh, so long to wait).  I am planning on adding some flip flaps or expanding the number of photos on the layout in some other manner.  I will show the layout with photos   Check back in a couple of weeks and I will let you know how it goes.

I want to thank you for stopping by today.  I hope my week of Harry Potter layouts has inspired you to either create something Harry Potter themed or bust into your stash!!  And, if you happen to be looking for a ting little Alphabet, I have an extra set of the "A typeface" alpha available.

Check back next week for more never-ending spring break scrapbook layouts.


Stay well and Happy crafting!!
TINA Stanczak
Facebook |     Emptynest   Scrapin   (private group for project instructions)

Thursday, May 14, 2020

Throwback Thursday - Cricut "Wizard Spells" Layout

WELCOME FELLOW PAPERCRAFTERS! 


Today I am again featuring Guest Designer Ginni Candelaria.  Ginni is a fellow Close To My Heart (CTMH) consultant who designers layouts using Cricut cut files and CTMH paper packets.  To continue my progress, I wanted to do another Harry Potter themed layout called "Spells".  

Similar to the first 2 layouts of Ginni's workshop, I knew I had to make this layout from the first time I saw it.  The layout brought back memories of the second time we experienced Harry Potter land at Universal.  Sometime between 2010 and 2015 Universal had changed up they attractions and wands to add in IR technology.  Now you could buy a wand and walk around Harry Potter land casting spells which would do things like dump a pot of water on someone's head.  Of course we had to get a magic wand and give our spell casting a try.  The thought of walking around casting spells with my daughter makes me smile. "Hermioine" (aka my daughter) was very good with the wand and demonstrated for more than one child who was having problems casting the proper spell.

Back to the layout. I didn't have the patterned papers Ginni used to create the layout so I went into the way back machine, i.e. spend an hour digging around in my craft room. I found some very old patterned paper from Close To My Heart called B&T (Background and Texture) paper.  I was pretty happy with what I came up with.

Ginni had used a New England Ivy (green) patterned paper on her layout.  I had a similar New England Ivy (green) patterned paper.  Ginni used Sapphire (blue) patterned paper on her layout.  I used a totally different blue patterned paper on my layout.  I also substituted Ruby for pomegranate.  

This brings me to my first tip for stash busting.  Organize your paper.  I used to keep all of my cardstock with the paper packet of matching patterned paper.  I felt like it took me a long time to fins anything this way.  Now I keep my paper in an IKEA shelf system organized like a rainbow.  I  
keep all of my cardstock together (current and retired) so if I need blue, I can qucikly find the right blue.  

I have a similar approach for generic patterned papers that can be used as backgrounds so I can quickly find what I need.day.  


My other happy find during my trip in the way back machine was vellum. I think it might be leftover from making baby showers invites in the early 2000s? Anyway, I organize my scraps into Ziploc bags of neutrals, red/orange/yellow, and purple/blue/green.  This helps me quickly find scraps.  The vellum was tucked away with the neutral scraps.  I happened across it while looking for scraps of white to use when cutting the bubbles.  I used the vellum instead as I felt it gave a more bubble like feel.  Keeping my paper and paper scraps organized helps me quickly find what I need to make the Cricut cuts and move on to putting the layout together. 

My last tip has to do with organizing your bling.  I keep all my bling instead the small CTMH organizer.  This organizer sits in the top shelf of my craft cart making it easy for my to reach in and grab out a pack of dots or sequins or whatever I need to put the finishing touches on any layout I am working on. 

Feels good to have used some supplies I had been holding on to for a while.

Tomorrow I hope to finish the final 2 layouts in the GInni Harry Potter workshop, but first I have to pick the pictures for the layouts as I am thinking I might have to mix up the colors of the base pages or Cricut cuts to better match the pictures.  Wish me luck.


Stay well and Happy crafting!!
TINA Stanczak
Facebook |     Emptynest   Scrapin   (private group for project instructions)


Wednesday, May 13, 2020

Work On it Wednesday - Cricut Welcome Muggles Layout

WELCOME FELLOW PAPERCRAFTERS! 


Today I am again featuring Guest Designer Ginni Candelaria.  Ginni is a fellow Close To My Heart (CTMH) consultant who designers layouts using Cricut cut files and CTMH paper packets.  Now that I was on a roll with a Harry Potter theme, I decide to create this another layout from Ginni's workshop called "Welcome Muggles".


This layout came together fairly quickly using the cut file and cardstock I happened to have on hand from yesterday's layout.  As luck would have it, the dark red and yellow pattern was on the backside of the brick patterned paper.  I will admit Harry's tie was cut by hand out of a scrap of patterned paper left over from a different layout.  It was extremely lucky I just happened to have a scrap that was exactly the right size to make the tie.

Supplies needed:

In addition to the happy accident with the tie, I changed up two things to make this layout "my own".  First, I used Linen for my base pages since I thought the Linen color is more neutral and would allow my photos to "pop".
The other item I changed was I used I piece of yellow striped cardstock from a retired mix in paper packet to make the photo mat.  I colored the white stripes using the "dark" portion of the Dark Red Triblend marker.  If you don't have a sheet of yellow striped paper at home, you can easily create this photo mat coloring both the yellow and red stripes on to white cardstock.  Hint: make it easier by just coloring the edges since a photo will be covering the center.

Check back in tomorrow for another cute Harry Potter layout and some stash busting tips.

Stay well and Happy crafting!!
TINA Stanczak
Facebook |     Emptynest   Scrapin   (private group for project instructions)

Tuesday, May 12, 2020

Guest Designer Tuesday - Cricut Platform 9 3/4 Layout

WELCOME FELLOW PAPERCRAFTERS! 


Today I am featuring Guest Designer Ginni Candelaria.  Ginni is a fellow Close To My Heart (CTMH) consultant who designers layouts using Cricut cut files and CTMH paper packets.  Ginni's Harry Potter workshop launched in March of 2019, however I had not had the chance to create these layouts.  Now that I was on a roll with a Harry Potter theme, I decide to create this layout called "Platform 9 3/4s".

Having immersed myself in the memories of the first time we visited Hogsmead at Universal, my mind quickly moved to our second visit to Harry Potter world at Universal.  Diagon Alley had opened the year before along with the Hogwarts Express.  Platform 9 3/4s and the train ride were amazing.  How could I not create this layout?.  

I started by using Ruby cardstock as the base for the layout. I cut the brick stencil and inked the bricks on the base pages. I wasn't satisfied with the results. As you can see from the picture below, the bricks are barely discernible.

So off I went to my stash. I found a wonderful piece of patterned paper perfect for the layout.
I cut everything else as per the instructions. I did not have the black ribbon for the bows so I went into my stash and found a pack of Fundamentals Assortment Black with some cute little black bows I could substitute.

I am really happy with how this layout turned out.  And very excited to go find pictures to put on it.


Supplies needed:

  1. X5965 Ruby Cardstock
  2. X5961 Saffron Cardstock
  3. X5946 Linen Cardstock
  4. 1385 White Daisy Cardstock  
  5. X6047 Black Cardstock
  6. Charcoal Cardstock
  7. Toffee Cardstock
  8. Z3312 Gold Glitter Gems
  9. Z3517 Black Journaling Pen (.05)
  10. Z2497 TriBlend Dark Red Marker
  11. Retired Fundamental Assortment Black
Check back in tomorrow for another cute Harry Potter layout and some stash busting tips.

Stay well and Happy crafting!!
TINA Stanczak
Facebook |     Emptynest   Scrapin   (private group for project instructions)

Monday, May 11, 2020

Motivation Monday - Cricut Quidditch Layout

WELCOME FELLOW PAPERCRAFTERS! 


Today I am having a hard time motivating myself.  Don't we all have days like that?  I decided to take a quick peak into my saved Cricut projects to see if I had saved a scrapbook layout I could tackle quickly to get myself back on a roll.  

And what did I come up with? A Harry Potter Quidditch layout suited my mood, as I was still feeling like I was stuck in the spring break version of the movie Groundhogs day.  And, the last spring break vacation we took as a family was to Orlando, where we spent days immersed in the world of Harry Potter. 

I realized after I photographed the layout I had one of the quidditch goal posts in the wrong place. Shh....don't tell me kids. 


I used cardstock that a friend of mine had given me when cleaning out their craft room.  Don't ask permission, Go ahead, scrap your stash!!

I really liked the green textured paper as it looks just like grass.  The gold and the red are also textured cardstock. All 3 papers were from my friends craft room. Most everything else was cut from craps I pulled out of my scrap box. 

Completing this layouts brought back memories of the first time we visited Hogsmead at Universal.  We were there for the grand-opening on June18,2010.  We had arrived into Orlando June 9th and the next day decided to do a couple of days at Universal before the grand opening crowd.  As luck we have it, we were walking by a 20 foot tall gate that led to Hogsmead when an employee asked us if we would like to go it, try the rides and take a survey.  The answer was HECK, YEH!!

Of course, it was amazing.  We got to ride the flagship attraction "Harry Potter and the Forbidden Journey" not just once but twice in a row.  Part of the ride is flying thru the Quidditch pitch.  


Mission accomplished, I am now motivated to complete a set of Harry Potter layouts designed by a guest designer.  Check back tomorrow for Guest star Tuesday to see what I am working on.


Stay well and Happy crafting!!
TINA Stanczak
Facebook |     Emptynest   Scrapin   (private group for project instructions.